IPS-Integrated Project Services, a Berkshire Hathaway company and one of the fastest-growing companies in the AEC industry, has shared five tips on how to make sure your airflow visualisation study is successful.
It’s commonly known that ISO 14644-3 Cleanrooms and Associated Controlled Environments Part 3: Test Methods, EU Volume 4 Annex 1 Manufacture of Sterile Medicinal Products, and the US FDA Guidance for Industry Sterile Drug Products Produced by Aseptic Processing – Current Good Manufacturing Practice recommend that airflow patterns and airflow studies be performed to characterise/document airflow patterns in cleanrooms, barrier systems, and controlled environments.
These studies are commonly known as airflow visualisation studies (AVS). They can help evaluate airflow direction and uniformity against design specifications, identify undesirable airflow patterns, and identify patterns before choosing environmental monitoring locations for cleanroom classifications, ongoing EM programme sampling, and as part of risk assessments.
Conducting AVS is a common but often misunderstood and incorrectly executed practice. Many well-intended studies can come under scrutiny and rejection from auditors by inadvertently implementing these most commonly observed mistakes. These five tips can ensure that your airflow visualisation study is successful.
Tip 1: Know what type of smoke/fog distribution setup you are testing
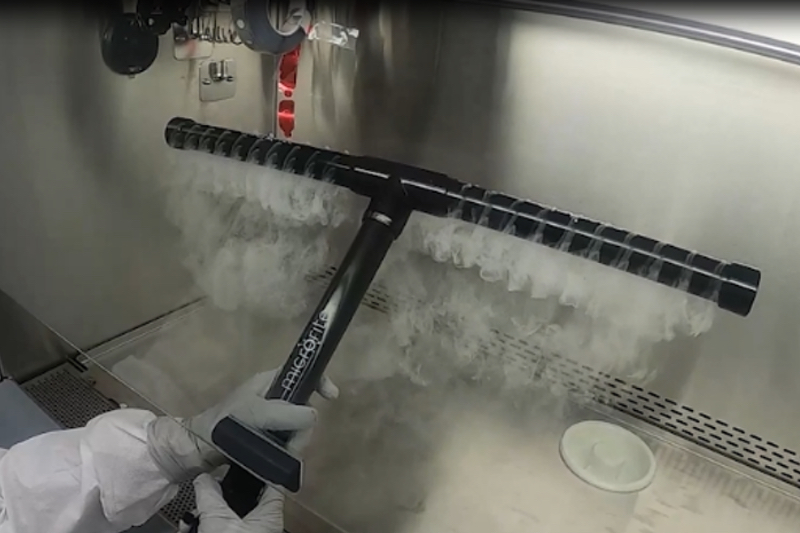
There are a variety of different setups that are available to perform airflow visualisation studies, all dependent on the equipment or room airflow pattern being tested. Formats can vary from fixed piping configurations constructed to stay in one place to strategies involving handheld smoke “wands,” which are used dynamically by a person moving the wand over the observed area/airflow pattern under test.
Some common mistakes to avoid with piping setups include:
- Improperly configured piping does not initiate the smoke at the very beginning of the airflow source.
- Piping that is not placed correctly to supply consistent, even smoke over all of the process equipment involved in the Study.
- If using a handheld wand, the person holding the wand can often inadvertently interfere with the observed airflow, disturbing its natural pattern and thus invalidating the actual test. Standard fixed piping setups are typically available for biosafety cabinets, HEPA filters, airflow returns, doorways, and other equipment. They are preferred since you can eliminate human interference in the tested airflow.
Tip 2: Use the appropriate type of smoke / fog-generating material
There are different types of smoke-generating materials; some have varying “durations,” meaning how long the smoke lasts visually and how long you can see and record it. Depending on the distance the smoke needs to travel or the air change rate of the unit under test, many smoke studies experience the smoke “disappearing” before it reaches the end of the route it’s traveling and being recorded. For example, recording a smoke pattern in a Biosafety Cabinet is a relatively short distance; the smoke doesn’t need to “last” and be visually present for a very long time. In comparison, recording an airflow pattern for a longer distance, such as from a ceiling HEPA supply filter to a low wall return vent, is a much longer distance.
Certain smoke materials are designed to visually disappear within a few seconds, some last longer, and others can endure for an extended period before dissipating. The trick here is to find the correct balance between a good smoke duration and the length of time you need to record it so it shows up strongly on a recording versus using a smoke that lasts too long, such that the room you’re working in fills up with smoke. Both extremes do not show well on camera, will not fully represent the recorded airflow, and may be misinterpreted by auditors inspecting the videos.
Tip 3: Consider Smoke Generation Equipment
When discussing the “smoke” used in an AVS, it’s more of a fog generated from the equipment source. Typical equipment used in smoke studies to generate smoke fog includes the following:
- Carbon Dioxide (CO2) foggers
- Glycol Solution based foggers
- Liquid Nitrogen based foggers
- Deionized (DI) water based foggers
- Combination of liquid Nitrogen and DI water based foggers
The fog used in an AVS needs to be as neutrally buoyant as possible, meaning the fog particles will not be affected by gravity and will not “fall” or “drop” to the ground when there is no airflow.
Water-based fog generators such as CO2 and liquid nitrogen create a fog that can be heavier than air; thus, they may not always represent how the actual air pattern in the study is behaving because gravity can influence how these fogs “settle”.
Glycol-based solutions that are closer to neutrally buoyant and have a variety of “durations” of visibility have been modified and selected for use. Therefore, choosing the best smoke fog material, including its source equipment, is critical in conducting an AVS that accurately represents the observed airflows.
Another consideration to make when deciding which type of smoke generation equipment to use is the type of process equipment that may be the focus of the study, such as automated aseptic filling lines, packaging / visioning equipment, or other equipment with sensitive instrumentation and limited space.
Tip 4: Inject the Smoke at the Correct Angle
It is essential to inject the smoke perpendicular to the airflow, not with the airflow, so you can accurately visualise the air pattern. Injecting the smoke into the airflow (if its generation is downward) is also acceptable. However, that may create extra turbulences and variables if a short airflow path is observed and, therefore, not preferable.
Smoke studies executed with the smoke emitted in the same direction as the airstream flow is the wrong technique. It gives the smoke an incorrect head start and does not truly represent the air pattern. In general, using a piping manifold that allows for multi-directional smoke ejection is a simple way to properly introduce smoke into the area of testing.
Tip 5 Optimise lighting and recording angles
The most important outcome of a smoke study is the accurate video evidence that indicates to auditors that your airflow patterns are behaving as they should. Recording AVS at multiple angles with the correct lighting level can give you the result you’re looking for.
- Optimal recording angles: Depending on the subject size, at least two cameras should be utilised to capture the airflow patterns being studied from opposite sides of the airflow pattern. The view from each opposing camera should be wide enough to capture all the airflow and smoke involved in the Study but not too far, otherwise detail will be lost. The angles should capture the entire length of the smoke pattern, any operator manipulations (if a dynamic smoke study), and the equipment being utilised. Recording at the wrong angles may not include all of the smoke curtain, the operator manipulations, or air flowing over the equipment. Missing anything from the study process can invalidate the whole effort.
When there is a distinct inside and outside of the subject of the study, such as a Biosafety Cabinet that has an inside of one ISO classification and an outside of a different classification or pass-throughs/thresholds/doorways between rooms where airflow directionality and potential leakage is the focus, it is always recommended to have at least two cameras to capture different angles. However, only one camera may be best when the subject is a filling line or HEPA-filtered air supply within an ISO-classified room.
- Optimal lighting: The proper lighting is crucial for an accurate smoke study video playback. Ensure optimal brightness to avoid glare, making distinguishing smoke from the background easy. Review the playback immediately after the Study to confirm its fidelity to the actual conditions. Finding the balance is critical – not too bright to cause glare or too dim to miss essential details. Experiment with contrasting backgrounds to enhance visibility.
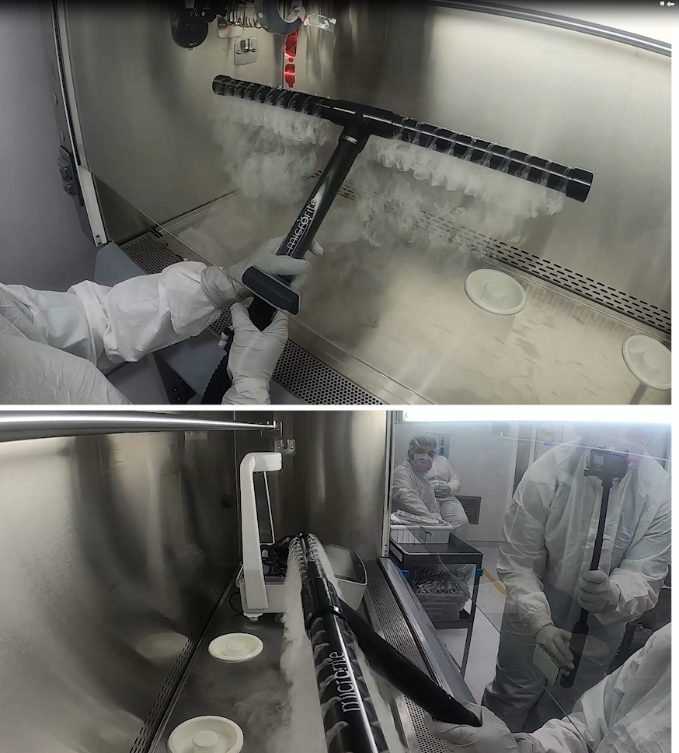
Two camera angles shot simultaneously during AVS of a biosafety cabinet
In both the cases of recording angles and lighting, it’s often helpful to perform practice runs to fine-tune the camera angles and lighting, which can help verify that you’re capturing the smoke and airflows you originally intended before executing the actual AVS.
Engaging in AVS without prior experience can pose challenges and unintended consequences. However, adopting our tips for conducting successful airflow visualisation smoke studies is a valuable initial approach to executing AVS. Thoroughly assess each point and tailor them to your specific circumstances. After this careful evaluation, commit to avoid repeating any identified mistakes. This proactive approach enhances the likelihood of a successful AVS execution.


