Manufacturing systems and the components that make them work must meet stringent cleanliness requirements to function correctly. The degree of cleanliness necessary is often greater in hi-tech operations such as those found in spacecraft, rocket launch facilities, chip makers, and biotech facilities.
Fewer post-cleaning contaminants are allowed in these industries. A visual inspection of critical surfaces is simply not enough. The post-cleaning contaminants must be measured so that the surfaces of the system being cleaned can be certified as meeting the required cleanliness.
Cleanliness “levels” are defined in a variety of industry-specific documentation as well as a general use document from the Institute of Environmental Sciences and Technology (IEST) entitled Product Cleanliness Levels - applications, requirements, and determination. Known as IEST-STD-CC1246E, the standard provides methods for specifying and determining product cleanliness levels for contamination-critical products.
The standard puts emphasis on contaminants that can impact product performance. The requirement is that post-cleaning contaminants be verified through measurement that makes “cleaning” become “precision cleaning”, often defined as the removal of particles down to less than a micron in size.
There are several items that can be measured regarding surface cleanliness. Particles, fibres, and residues are the main ones that are measured in precision cleaning cleanliness validation. This is an overview of each contaminant and the tests performed to measure them.
Solid contaminants
Particles and fibres are solid contaminants that are often introduced during a manufacturing process or maintenance shift when critical surfaces are open to the environment.
These contaminants are made up of a variety of materials, including metals, plastics, and silica-based compounds like sand. They range in size from the easily visible to the naked eye to those so small they can only be seen under magnification.
Fibres are a subset of particles. They are also solid contaminants made up of a variety of materials. What makes them a fibre is that they have a length to width ratio of 10:1 or greater.
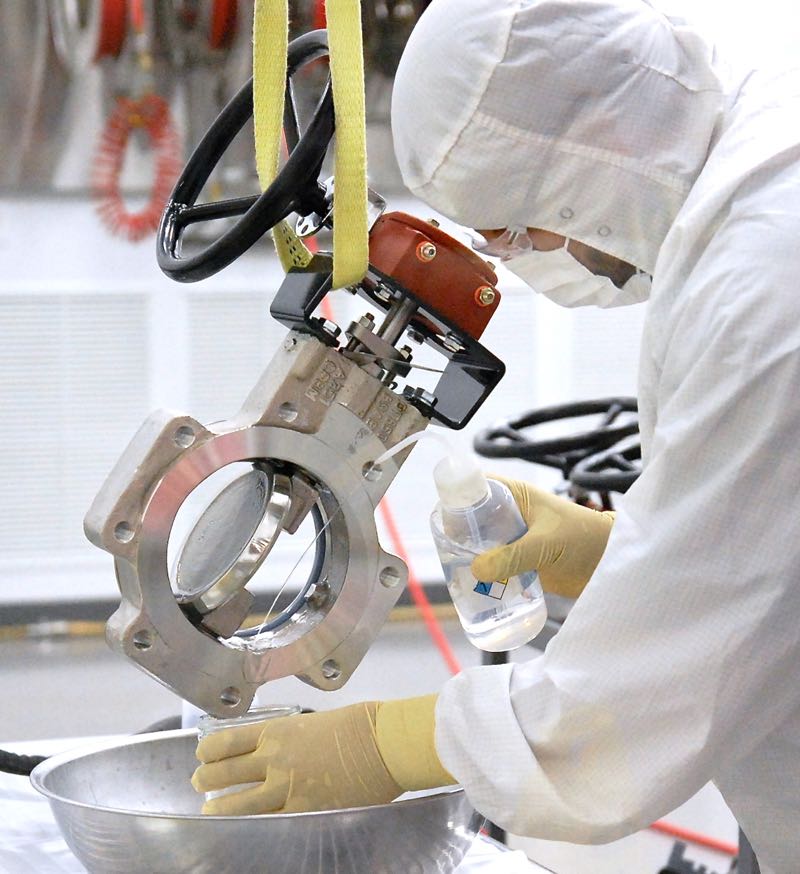
Particles and fibres are collected, usually by rinsing the critical surface with a measured amount of finely-filtered solution, which is captured in a clean beaker or similar container. It must be a precision-clean container so it does not contribute particles to the sample!
The solution containing the particles and fibres is filtered through a membrane filter rated at 0.45 µm, which deposits the particles and fibres on the surface of the membrane filter. This filter membrane is then placed in a holder, which is then set on the microscope stage under good illumination.
Using an eyepiece with a reticle that is specifically calibrated, the particles and fibres are then counted and individually measured. This is laborious work and can feel quite tedious; however, it is critical that the counts and measurements are accurate.
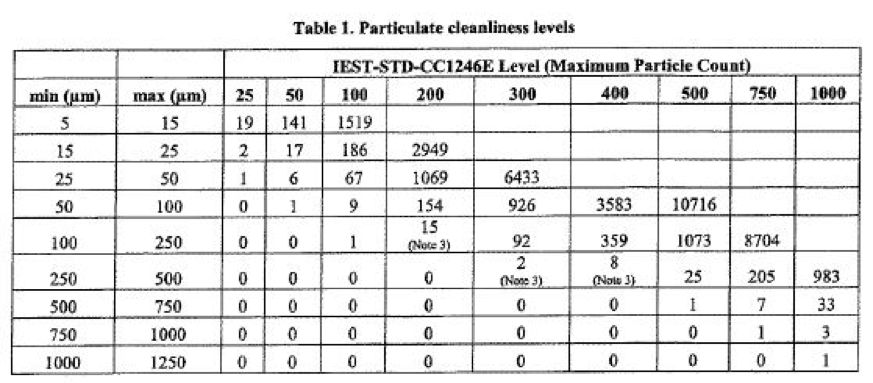
The data is recorded, usually grouping the particles in “bins” of a defined range of sizes. Typical size ranges are shown in the table below, along with the allowable number of particles per 0.1 sqm of critical surface area for certain particle “levels” that the surface is being certified in accordance with the IEST-STD-1246E document.

Note that particles are counted down to a size of five μm, which cannot be seen with the unaided eye. This entire process is termed a particle count.
If the filter membrane that was used for the particle count was of a known tare weight, it is also possible to determine the collective mass of the particles and fibres. The filter is carefully dried in a vacuum oven until it reaches a steady weight.
The difference in the filter weight when the contaminants are on the membrane versus the tare weight is the total filterable mass or TFS, which is used in measuring and certifying critical surfaces to a cleanliness level, usually along with the particle count. Which test is required is normally defined by the specification that the system owner wishes to use to certify that system.
Residues

Residues are amorphous (shapeless) contaminants that are typically made up of hydrocarbon oils and greases. Because of the sticky and semi-liquid nature of these contaminants, they must be collected from a critical surface by dissolving them in a suitable solvent.
Solvent selection is usually dictated by the specification used for certifying the cleanliness level with consideration given to the nature of the surface being tested.
The residue sample is collected by washing the surface with a measured amount of the solvent, with the solvent then captured in a clean beaker or other container. Again, the container must be precision-clean so that it does not contribute more residue mass to the sample.
The solution is passed through a membrane filter rated at 0.45 µm, which removes the solid contaminants from the solvent. This solids-free solvent can then be evaporated down to a few millilitres, which concentrates the residue picked up when washing the surface.
The final few millilitres are then evaporated to dryness in a weighing dish of know tare weight. This dish with the dried residue in it is then carefully weighed on an analytical balance (which was also used to determine the tare weight of the dish). Subtracting the tare weight of the dish from the weight of the dish with the dried residue, the mass of the residue is then determined.
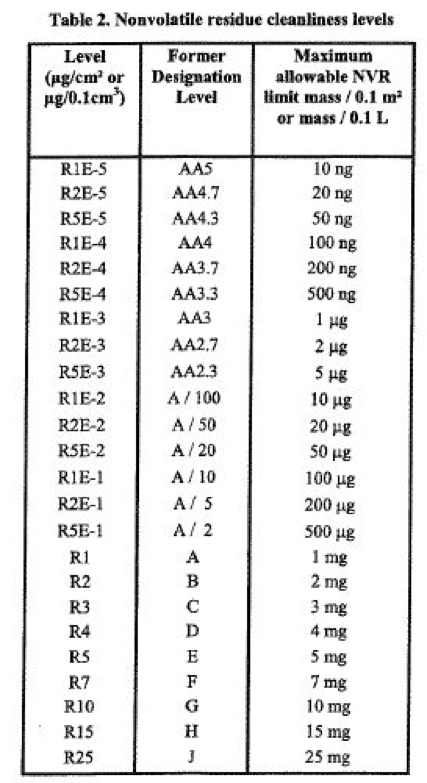
This entire process is termed gravimetric non-volatile residue mass determination but is usually referred to simply as the NVR. Typical residue limits for each NVR level are shown in the table below, along with the allowable mass of residue per 0.1 sqm of critical surface area for certain NVR levels that the surface is being certified to according to the IEST-STD-1246E document.

You may have noticed that many of the steps in sample collection and filtration are common to performing a particle count and the NVR determination. In most cases, a single sample is used for both measurements.
Ultraviolet light inspection
In some situations, longwave ultraviolet (UV) light inspection is an alternative to NVR measurement. It can be used to certify the residue cleanliness of a critical surface in instances where no fluid may touch the surface. It can also be used as a supplemental test.
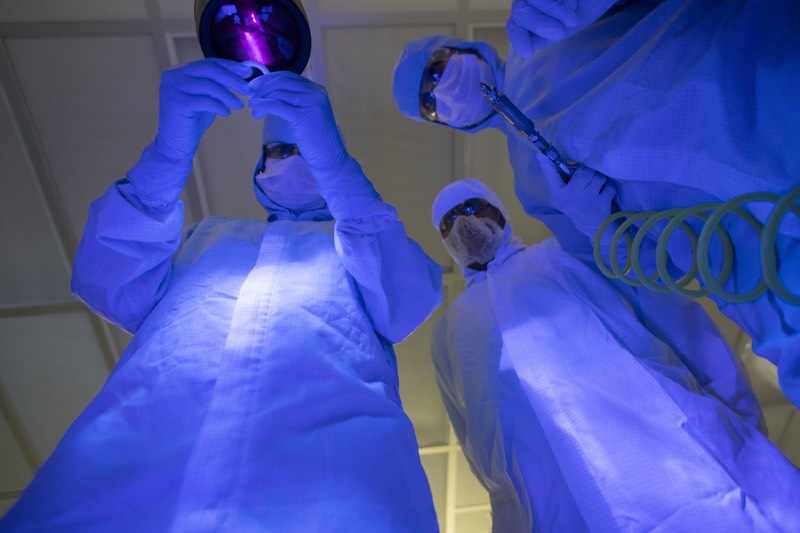
The critical surface is inspected in a dark room or chamber, and the longwave UV light source is aimed at the critical surface. Most, but not all, hydrocarbon-based oils and greases will fluoresce under this light.

Most hydrocarbon-based oils and greases will fluoresce under UV light
The UV source must be in a distinct wavelength spectrum that is found in the longwave UV band (also called UVA), which has a wavelength of 315–400 nm. The range used for UV inspection for cleanliness is typically from 375 to 400 nm.
The intensity of the UV light at the defined viewing distance must also be sufficient to cause fluorescence. A passing UV inspection is one where no fluorescence is seen on any critical surface.
The limitations of this test must be understood so that it is not used improperly. It is not a test that gives metric measurements, as it is pass/fail. Also, not all problematic residues will fluoresce. If these limitations are kept in mind, it can be a useful test for cleanliness measurement and validation.
It is appropriate for inspecting a surface that was precision-clean prior to a chemical bonding operation. It may also be appropriate for liquid oxygen (LOX) tank or pipe, depending on circumstances such as the required purity of the LOX service media.
It is not typically used for high-purity gaseous oxygen systems, especially at high pressures. The metric data produced by the NVR test is preferred, due to the risk of ignition or explosion if high-pressure GOX comes into contact with a sufficient mass of hydrocarbon contaminant.
There are several other cleanliness certification tests that may be used in certain situations. These include measuring ionic contaminants and using infrared sensors (FTIR) to determine the presence of hydrocarbon contaminants in the test solvent.
Other methods include passing a clean gas over a surface and then determining the hydrocarbon content, striking a clean and dry gas through a component and measuring the increase in the gas dewpoint (moisture content), and using a photoionisation detector to “sniff” for hydrocarbon solvent traces in the inert purge gas.
Safety, purity, and operability
Whatever the method, precision cleaning is essential to the measurement of contaminants after cleaning has been accomplished. As instruments and systems become more sophisticated and sensitive, the allowable cleanliness levels for both particles and residues are being driven ever lower.
A precision cleaning operation normally requires a cleanroom with a dedicated cleanliness verification laboratory. The sampling of critical hardware, as well as the processing of the samples and determination of the cleanliness levels, is performed in a cleanroom so that atmospheric contaminants do not confound the measurements necessary to certify the surface to specific cleanliness levels.
This operation requires a controlled environment because particulate and molecular contaminants can be airborne and deposit on a surface or in a beaker.
The instrumentation used in these laboratories is expensive and must be periodically calibrated to assure accuracy. Particles that are invisible to the unaided eye must be counted and measured, and residues that weigh mere micrograms accurately measured. As the cleanliness levels are driven downward by new systems with ever-greater sensitivity to contaminants, upgrades to the laboratory equipment and instrumentation must be made.
Precision cleaning is a very dynamic industry that helps assure human spaceflight safety as well as industrial systems operability and purity in drug manufacturing and biotech product lines.
The subset of precision cleaning, called oxygen cleaning, guarantees that disastrous flash fires and explosions are not caused by stray hydrocarbon contaminants left in an oxygen system. Product purity in a wide variety of gas and liquid systems is protected by precision cleaning and cleanliness certification.
All of the above benefits to safety, purity, and operability are possible only through post-cleaning contaminant measurement, which allows for systems and components to be certified to a required cleanliness level.
Precision cleanliness matters and has an impact on the real world.
N.B. This article is featured in the May 2019 issue of Cleanroom Technology. The digital edition is available online.
